A1/A2 Testing
A1/A2 (beta-casein)
Beta-casein makes up 30 percent of milk protein and comes in two forms: A1 and A2 beta-casein. The difference between A1 and A2 beta-casein is determined by the genetics of the animal. Reports indicate that A2 beta-casein proteins are potentially more favorable to digest due to the change in protein structure. Milk being marketed as A2 claims the product does not contain the A1 protein. Studies have linked possible health benefits to A2 milk consumption. While health benefits are still being debated, A2 milk is selling in the USA and other markets at a premium over standard milk.
The A2 genotyping assay identifies the A1 and A2 beta-casein status of individual animals, providing insight for strategic breeding to develop A2 herd status.
Accuracy: blood and tissue 99%, and milk: 94% accurate.
Sample Types
- Whole Blood – purple top blood tube only
- Tissue – Fresh or Frozen
- Milk – Fresh, Frozen, or Preserved
WHEN TO USE
- Test at any age or time at your convenience
Testing Strategies
- Herd-wide testing helps drive genetic progress for A2 breeding and milk production. The rate of converting a herd to A2 status depends on the course of action. Many testing strategies exist and begin with testing all animals.
- Test all females. Keep only those verified as A2/A2 and sell the rest. Select homozygous A2/A2 sires for all future matings. To expedite progress, use female-sorted homozygous A2/A2 sires for all breedings. This is the fastest approach to achieving A2 herd status.
- Test all females. Sell animals verified as A1/A1. Select homozygous A2/A2 sires for matings on all other animals. Using female-sorted homozygous A2/A2 sires will expedite progress.
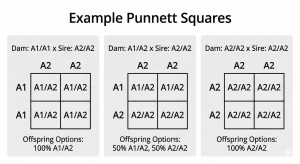
- Females verified as A2/A2, bred to A2/A2 homozygous sires will produce only A2/A2 offspring. Females verified as A1/A2 bred to homozygous A2/A2 sires have a 50 percent chance to produce A2/A2 offspring with each breeding. Females verified as A1/A1, bred to A2/A2 homozygous sires will produce only A1/A2 offspring.
- Example Punnett Squares
Result INTERPRETATION
- Reported as A1/A1, A1/A2, A2/A2, or Retest
- Retest results should be verified by blood or tissue
- Both genes present will be expressed as proteins in the milk. For instance, if a cow has a result of A1/A2, this cow will produce milk that contains both the A1 and A2 proteins.
- A retest result means the DNA could not properly amplify definitively into one of the specified result categories. A new blood or tissue sample should be submitted for verification.
Testing Supplies
- Shippers and sampling supplies available to purchase online
- Ear notcher to collect tissue samples
FAQs
What is A1/A2 beta-casein, and why does it matter in dairy cattle?
A1 and A2 are two genetic forms of beta-casein, a key milk protein produced by dairy cows. The difference is determined by the cow’s genetics. Cows with the A2/A2 genotype produce milk containing only A2 protein, which is often marketed as easier to digest. As A2 milk gains consumer demand and premium pricing, dairy producers are using A2 genetic testing to identify and breed cows that produce A2-only milk.
Why should I test my dairy herd for A2 status?
A2 genotype testing allows dairy producers to make informed breeding decisions that improve herd genetics and marketability. By knowing which cows are A1/A1, A1/A2, or A2/A2, you can plan matings to increase the percentage of A2/A2 females in your herd. Building an A2 herd may open access to specialty milk contracts, niche markets, and higher milk value.
What samples are required for A2 genetic testing in cattle?
Testing is flexible and can be done at any age using common sample types, including:
- Whole blood (purple top blood tube)
- Tissue (fresh or frozen ear notch)
- Milk (fresh, frozen, or preserved)
Follow CentralStar’s sample collection guidelines to ensure accurate A2 test results.
How do I read my A1/A2 milk protein test results?
Your animal will fall into one of four result categories:
- A1/A1: Produces only A1 beta-casein
- A1/A2: Produces both A1 and A2 proteins
- A2/A2: Produces only A2 protein (desired for A2 milk herds)
- Retest: Sample was inconclusive; a new sample is needed
These results indicate what type of milk protein the cow will produce and guide future breeding choices.
How do I breed for an A2/A2 dairy herd?
Use your test results to create a breeding strategy:
- Fastest herd conversion: Keep only A2/A2 females and breed exclusively to A2/A2 sires using AI or female-sorted semen.
- Gradual improvement: Remove A1/A1 cows and breed A1/A2 females to A2/A2 sires to increase A2 genetics over time.
With consistent selection, a predominantly A2 herd can be achieved within a few generations.
CentralStar laboratory services are intended solely for the detection of specific microorganisms or viruses in approved sample types. These services do not evaluate, certify, or guarantee the safety of milk for human consumption. It is recommended that interpretation of the results provided, and management decisions based on these results be done under the advisement of a veterinarian.